


Maintaining the appearance of your vehicle is essential for both aesthetics and value. One area that often requires attention is the plastic trim, which can become faded, scratched, or damaged over time. Commonly found on bumpers and door panels, this trim plays a crucial role in the overall look of your car. Fortunately, repairing and repainting plastic trim is a straightforward process that you can accomplish with just a few simple steps.
Proper care of your vehicle involves regularly inspecting the trim for any signs of wear and tear. By addressing these issues early, you can prevent further damage and maintain the beauty of your car’s exterior. In this guide, we will walk you through the essential steps to repair and repaint your plastic trim, ensuring it looks as good as new.
Whether you’re dealing with a scuffed bumper or discolored trim, our easy-to-follow instructions will equip you with the knowledge needed to restore your vehicle’s trim effectively. Get ready to roll up your sleeves and give your car the care it deserves, transforming its look with minimal effort.
Assessing Damage and Preparing the Plastic Trim
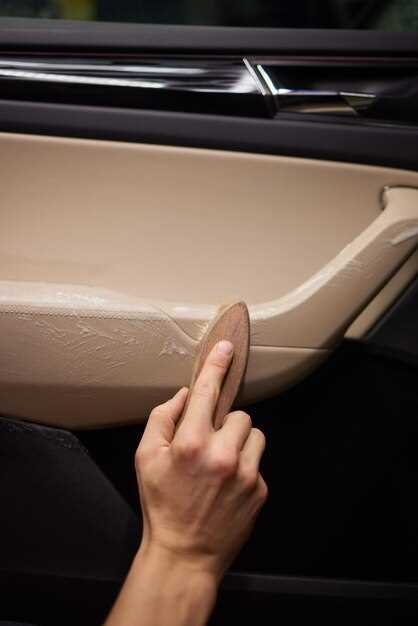
Before beginning the repair and repainting process for your plastic trim, it is essential to carefully assess the damage. Start by examining the trim for any visible cracks, scratches, or discoloration. Pay close attention to areas where the bumper meets the plastic components, as these are often prone to wear and tear.
Once you identify the damage, determine the extent of the repairs needed. For minor scratches, a simple sanding down and repainting may suffice. However, more significant cracks might require a more thorough approach, such as using a plastic welding technique or applying a specialized adhesive.
Proper care during assessment is crucial. Ensure the trim is clean and dry, which will help in accurately identifying imperfections. Use a soft cloth and a mild detergent to remove dirt and grime, making it easier to see any issues that need addressing.
After assessing the damage and cleaning the area, gather the necessary tools and materials. This preparation phase will streamline the repair process and ensure that you’ll achieve a professional-looking finish once you begin repainting the trim.
Choosing the Right Paint and Tools for Trim Repainting
When it comes to repainting plastic trim, selecting the appropriate paint and tools is crucial for achieving a professional finish. Start by choosing a high-quality paint specifically designed for plastic surfaces. These paints adhere better and provide a durable finish that can withstand the elements. Look for options labeled as ‘plastic-friendly’ or ‘flexible’ to ensure they won’t crack or peel over time.
For trim and bumpers, opt for products that offer UV protection to prevent fading and discoloration from sun exposure. Matte, satin, or gloss finishes can be chosen based on your desired look, with matte finishes often providing a more OEM-like appearance.
In addition to paint, the right tools will significantly impact your results. Begin with a set of fine-grit sandpaper to prepare the surface, ensuring that it’s clean and smooth. A good quality painter’s tape will help to mask off areas that should not be painted, providing clean lines and preventing overspray.
A spray gun or aerosol cans are recommended for an even application, particularly on larger surfaces like bumpers. Always remember to practice your technique on a scrap piece of plastic before starting on your trim to avoid any mistakes. Finally, a clear coat can be applied over the paint for added protection, enhancing durability and shine, ensuring your trim looks its best for years to come.
Applying Primer and Paint to Achieve a Durable Finish
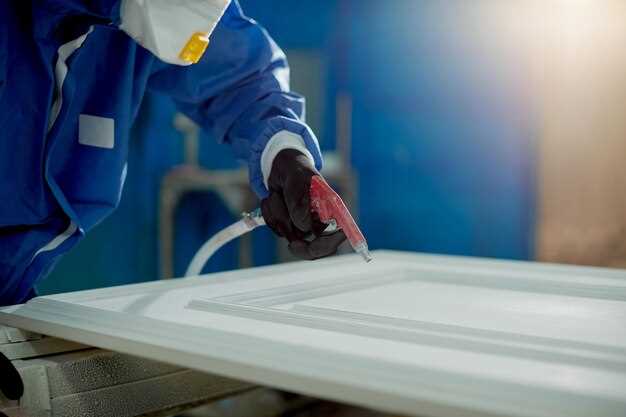
When restoring plastic trim, particularly on bumpers, applying primer and paint correctly is essential for achieving a long-lasting finish. Start the process by selecting a high-quality plastic primer specifically designed for flexibility and adhesion. This will ensure that the paint adheres well and withstands the elements.
Before applying primer, make sure the surface is clean and free from dirt, grease, and any previous coatings. A thorough cleaning with soap and water followed by a wipe down with isopropyl alcohol will prepare the trim adequately. Once dry, lightly sand the surface using fine-grit sandpaper to create a texture for better adhesion.
Apply the primer in thin, even coats. This will help avoid drips and runs that can mar the final finish. Allow each coat to dry as per the manufacturer’s instructions, usually around 30 minutes to an hour. For optimal results, two to three coats of primer are recommended, especially for areas exposed to wear and tear.
After the primer has fully cured, it’s time to apply the paint. Choose a high-quality automotive paint that matches the color of your trim. Spray paint is often the easiest application method, allowing for an even finish. Hold the spray can approximately 6-12 inches away from the surface and apply multiple light coats rather than one heavy coat, allowing each layer to dry completely between applications.
For a durable finish, consider using a clear coat after the paint has dried. This will provide additional protection against UV rays and environmental factors. Just like with the paint, apply the clear coat in thin layers and allow for sufficient drying time. Adequate care during this process will ensure that your bumper and trim stay looking great for years to come.


