


Minor cracks in your car’s bumper can be more than just an eyesore; they can also lead to further damage if left unaddressed. Whether caused by an unfortunate parking mishap or the wear and tear of daily driving, these small imperfections can compromise the integrity of your vehicle’s exterior. Fortunately, repairing them is a manageable task that can restore both the appearance and functionality of your bumper.
Understanding the nature of the damage is the first step in the repair process. Bumpers are typically made from materials like plastic or fiberglass, which may require different approaches for effective restoration. By properly assessing the crack and choosing the right repair method, you can ensure a long-lasting fix that will keep your car looking its best.
In this guide, we will explore various techniques for repairing minor cracks in your bumper, including step-by-step instructions and helpful tips. Armed with the right tools and knowledge, you can tackle this repair project confidently, saving time and money while enhancing the overall appearance of your vehicle.
Assessing the Damage: Identifying Cracks and Dents in Plastic Bumpers
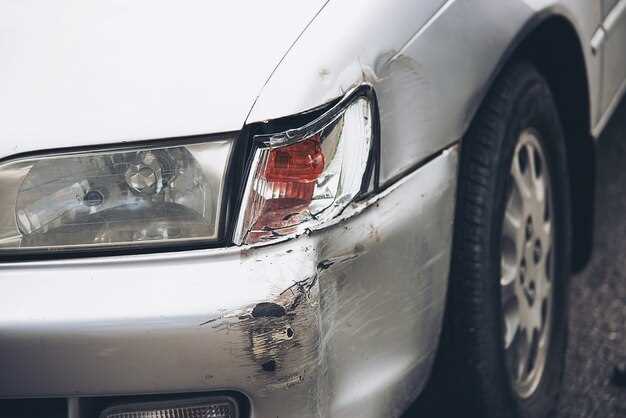
When examining your car’s bumper for damage, it’s crucial to identify any cracks or dents that may not be immediately visible. Start by inspecting the entire surface of the bumper, looking for any signs of irregularities. Gently run your fingers along the bumper to feel for uneven textures that might indicate a crack or a dent.
For plastic bumpers, visual assessment is key. Look for any discoloration, which may suggest the presence of a crack. Small fissures can often appear as dark lines or tiny fractures on the surface. Pay particular attention to areas near the edges and corners, as these spots are more prone to damage during minor collisions.
Next, check for any bumps or depressions that could signify a dent. Dents might not always be visible, especially if they occur on curved surfaces. Utilize a flashlight to help illuminate any subtle deformations in the plastic. If you notice a dent, assess whether it has broken the surface or if it’s merely a cosmetic issue.
Once you’ve identified cracks and dents, document their size and location. This information will be useful when planning your repair strategy. Minor cracks can often be repaired with adhesive or filler, while deeper fractures may require more extensive repair techniques. Understanding the extent of the damage ensures that you can effectively address the issues and restore the bumper’s integrity.
Step-by-Step Guide to Filling and Smoothing Minor Cracks
Repairing minor cracks in your car’s bumper is essential to prevent further damage and maintain the aesthetic appeal of your vehicle. Follow this step-by-step guide to effectively fill and smooth out those cracks.
- Gather Your Materials:
- Plastic or epoxy filler
- Sandpaper (grit 80, 120, and 240)
- Putty knife or a similar tool
- Primer
- Touch-up paint
- Clean cloth
- Masking tape
- Clean the Area:
Start by thoroughly cleaning the cracked area with soap and water. Ensure that there’s no dirt, grease, or wax that can interfere with the repair. Dry the area completely with a clean cloth.
- Prepare the Crack:
Use sandpaper (grit 80) to gently sand the edges of the crack. This will create a rough surface for better adhesion of the filler. Make sure to smooth out any sharp or jagged edges around the damage.
- Apply the Filler:
Using a putty knife, carefully apply the plastic or epoxy filler into the crack. Press down firmly to ensure it fills the entire space. Overfill slightly to account for shrinkage as it dries.
- Allow to Cure:
Follow the manufacturer’s instructions regarding curing time. Typically, it takes about 30 minutes to an hour for the filler to set, but it’s best to wait longer for a complete cure.
- Sand the Filler Smooth:
Once the filler is cured, use sandpaper (grit 120) to smooth out the patch. Progress to finer sandpaper (grit 240) for a seamless finish. Be sure to sand the surrounding bumper area lightly to blend the repair.
- Prime the Area:
After sanding, clean the area again and apply a primer to the patched section. Allow the primer to dry completely.
- Paint the Bumper:
Once the primer is dry, apply touch-up paint that matches your bumper’s color. Use even strokes and allow it to dry according to the paint instructions.
By following these steps, you can effectively repair minor cracks in your bumper, enhancing both its appearance and longevity.
Choosing the Right Adhesives and Tools for Plastic Bumper Repair
When it comes to repairing your car’s bumper, selecting the appropriate adhesives and tools is crucial for achieving a strong, long-lasting fix. The type of damage sustained by the bumper will significantly influence your choice of materials.
Adhesives specifically designed for automotive plastic are essential. Look for products that mention compatibility with plastic surfaces and are designed to withstand impacts and flexing. Epoxies and super glues are popular choices; however, consider using plastic-specific adhesives that offer superior bonding strength. Additionally, check if the adhesive is resistant to automotive chemicals and temperature variations.
In terms of tools, a well-prepared workspace is vital. You’ll need basic tools such as sandpaper for surface preparation, a utility knife for trimming damaged areas, and a putty knife for applying the adhesive. A heat gun can also be beneficial, as it provides added flexibility to the plastic during the repair process.
Always remember to clean the repair area thoroughly before applying any adhesive. This ensures a strong bond between the surfaces and increases the likelihood of a successful repair. Taking the time to choose the right adhesives and tools can make a significant difference in the longevity and quality of your bumper repair.


