


Repainting a classic car is a significant endeavor that combines artistry and technical expertise, essential for preserving the vehicle’s vintage appeal. The right paint not only enhances the car’s aesthetic but also protects it from environmental factors that may lead to deterioration over time. Understanding the nuances of selecting the appropriate paint type can make all the difference in achieving a stunning finish that complements the car’s original design.
One of the key factors to consider when repainting a vintage car is the choice of finish. Different finishes, such as gloss, satin, or matte, can dramatically alter the car’s appearance and how it reflects light. Additionally, opting for high-quality, durable paint ensures that the vehicle can withstand the rigors of use while showcasing its classic charm.
The preparation process is equally crucial, as it lays the foundation for a successful paint job. Proper sanding, priming, and cleaning remove any imperfections and contaminants that could affect the paint’s adherence and overall finish. Understanding these vital components is essential for any classic car enthusiast looking to revive their vehicle’s exterior to its former glory.
Choosing the Right Paint Type for Vintage Cars
Selecting the appropriate paint type for your classic car is crucial for maintaining its integrity and appeal. Vintage vehicles often require specific materials to ensure authenticity and durability. The right choice can enhance the overall aesthetics and value of your classic.
When considering paint options, two main categories come to mind: urethane and enamel. Urethane paints are popular for their superior durability and resistance to fading, making them ideal for cars exposed to the elements. On the other hand, enamel paints can provide a more traditional finish that is often preferred for restoration projects. They may not be as durable as urethane but offer a classic look that many vintage car enthusiasts cherish.
Another critical factor is the color. Classic cars often feature original or period-correct colors that are essential for authenticity. Researching the factory color codes for your specific model can prevent missteps that may detract from its classic appeal. Additionally, utilizing high-quality pigments ensures that the final look will not only be vibrant but also withstand the test of time.
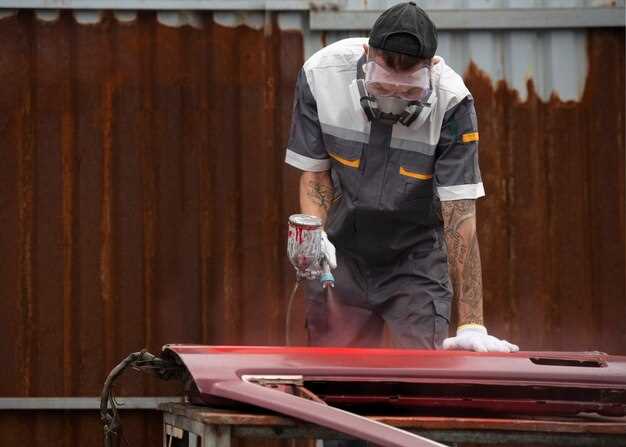
When choosing a paint type, consider the application method as well. Some paints are more user-friendly and suitable for DIY projects, while others may require professional expertise for optimal results. Utilizing a paint sprayer can yield a more even finish compared to traditional brushes, especially on larger surfaces.
Finally, always factor in the environmental conditions where your vintage car will reside. If it will be parked outside frequently, investing in a high-quality, UV-resistant paint will be advantageous. Conversely, for cars that remain sheltered, a less durable option might suffice.
In conclusion, selecting the right paint type for your vintage car involves a blend of authenticity, durability, and aesthetic preference. Taking the time to assess these factors will ensure that your classic vehicle shines as it should, reflecting its rich history while standing the test of time.
Preparing the Surface: Steps to Ensure a Smooth Finish

To achieve a stunning finish when repainting a vintage car, proper surface preparation is crucial. The first step involves cleaning the entire area. Remove any dirt, grease, or debris using a suitable solvent or degreaser. This ensures that the paint adheres well to the surface without any contaminants interfering with the bond.
Next, sanding the surface is vital. Use a combination of coarse and fine grit sandpaper to create a smooth and even texture. Start with a grit between 80 and 120 for initial sanding, focusing on any imperfections or rust spots. Follow up with finer grits, such as 220 or 320, to achieve a polished surface. This step is essential for removing old paint and ensuring that the new layer adheres properly.
Once sanding is complete, it’s important to repair any damages. Fill in dents, scratches, or rust areas with appropriate body filler. After applying the filler, sand it down until it’s flush with the surrounding surface, ensuring an even appearance. This attention to detail is vital for the restoration of any classic vehicle.
After repairs, the surface must be wiped down again to remove any dust or debris generated during sanding. Use a clean, lint-free cloth and a suitable cleaning solution to prepare the surface for primer application. This step helps in achieving a flawless paint job, as any remaining particles can lead to imperfections in the final finish.
Finally, apply a primer to the prepared surface. Choosing the right primer suitable for automotive paints is essential. This layer not only improves adhesion but also provides a uniform base for the paint. Allow the primer to cure fully before proceeding to the painting stage, ensuring that the final coat is smooth and aesthetically pleasing.
Matching Original Colors: Techniques for Authentic Restoration
Restoring a vintage car involves careful attention to its original colors, which is crucial for maintaining authenticity. Achieving an accurate color match requires a combination of techniques and resources.
Firstly, understanding the original paint formula of the car is essential. Many classic vehicles were painted using specific pigments and mixing processes that may differ from modern automotive paints. Researching production records or consulting with classic car clubs can provide valuable insights into original color codes.
Utilizing color samples is another important technique. If possible, obtain a small section of the original paint, such as from an inconspicuous area of the car. This sample can be analyzed using a spectrophotometer to determine its precise color properties. Alternatively, comparison with a color chip chart specifically designed for vintage cars can aid in identifying the correct shade.
Additionally, a skilled painter familiar with classic car restoration can mix paint to replicate the original shade accurately. They often rely on their expertise to adjust for variations that may arise due to aging or fading in the original paint. Incorporating methods like tinting and toning can help achieve a more precise match.
Furthermore, layering techniques can enhance the depth and richness of the paint, making the final product more authentic. Utilizing a base coat followed by clear coats can simulate the look of original finishes and add durability to the paint job.
In conclusion, matching the original colors of a vintage car is a meticulous process that demands research, careful sampling, and skilled application. Adhering to these techniques ensures the restoration not only preserves the car’s aesthetic but also maintains its historical integrity.


